Sunday, March 21, 2010

Status: horizontal stabilizer

Put in some productive shop time this weekend- got all the finish work done for one side of the HS (match drill, deburr, dimple, edge finishing, priming). Things are already starting to look like pieces of an aircraft  :)  This metal work is quite different from working with wood. Unlike wood, with metal most of your finish work is done before final assembly.


Here's a shot of the left half of the HS, assembled for drilling. Even the pre-punched holes need to be "match-drilled" to their final size. This ensures a perect fit when the time comes for rivets.


Here, I'm using a 12" #40 bit to get into a tough place. These long bits flex nicely as you drill, allowing you to get into tight spaces. I found that this technique was easier than using my angle drill.


Match-drilling the skin to a rib. The Cleco spring-clamps really help here :)


This kit is "pre-punched", which means that almost all the necessary holes are already there for you. The builder simply zips the parts together with clecoes. If the holes match, it must be right!

I have a lot of respect for the people who built aluminum planes before this feature was available.


Here's the left side horiz. stabilizer with all holes drilled out, waiting for disassembly, deburring, dimpling and priming. Then it'll be time to rivet. See you next week!

Sunday, March 14, 2010

Gave my band saw and drill press a new home

Made a table from some nice birch-veneer MDF that I had left over from building my EAA tables. The legs are salvaged from crates from work. Not much else going on, as they've been keeping me kinda busy  :)

Thursday, March 11, 2010

Started work on empennage, and built a paint booth.

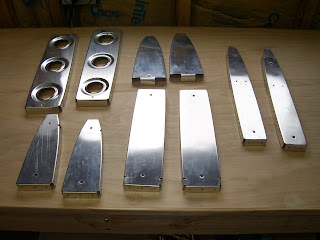
Here's a pic of the work I've done so far. Various parts for the HS (horizontal stabilizer). 


Most of the work in this project is prep work or finish work, i.e.- cut this part to size, shape it, drill holes, dimple or countersink, debur, and prime it if necessary before final assembly. The parts you see are all from the Horizontal Stabilizer, and are in one stage of completion or another.


For example, these ribs have to be marked...


...rough-cut with snips...


...and then all the rough edges and sharp corners removed with a Scotch-Brite wheel on my bench grinder.


The aluminum used in this kit is very strong, but also brittle. Any right angles must be removed, corners rounded, and even deep scratches buffed out as they can develop cracks over time- not good when at 10,000 feet!

When I'm finished, all the parts then have the edges dressed, dimples and countersinks made, all holes deburred, and then they get scrubbed with a scothchbrite pad in preparation for priming. The top-center ribs are the finished product from where we started with the snips.


Here's a pic of the paint booth I cobbled together. I'm only using it for priming, and it's vented to the outdoors with a computer case fan through a vinyl dryer hose. That little fan surprised me with how much air it moves!


And last but not least, always make sure you wear the proper safety equipment! Seeya next week  :)


Saturday, March 6, 2010

Empennage kit arrives!

Big day! After carfully filling out the order forms, and filling out the 'Payable to...' line, I waited ever so patiently for FedEx to deliver the empennage (French for 'tail feathers', I think). A week or so later, here's what we have-


Nice packaging...


...and here's everything unpacked and inventoried. The blue is a plastic covering that keeps the alclad aluminum sheet from getting scratched. Pay no attention to Bob Marley in the background... :)
One of the really nice features of this kit is that there is no price penalty if you order one sub-kit at a time. This is the route I'm taking. First will be the tail feathers, then the wings, the fuselage, and finally what is called a Finish Kit, which is everything else. Not included are the engine and avionics, uphostery and paint.

Tools- Part 2

A few pics of the more bling-y bits. What would an airplane factory be without a rivet gun? A 3x gun in this case, with a nice teasing trigger and assorted attachments.


This is a high-rpm air drill made by Sioux. A very nice tool- lightweight and controllable.


Here we have a pneumatic squeezer. Arguably, this tool could be called a luxury rather than an absolute necessity for building an aluminum aircraft. As for me, I consider it to be money well spent. As shown, it has the standard yoke attached; I also purchased a longeron yoke and a 4" no-hole yoke, to maximize the utility of this tool.


All these air tools are hungry, gotta feed 'em! I picked up this nice cast-iron 30 gallon compressor at Lowe's. My friend Chris helped me run a 240V line into the garage, and we converted the compressor to 220/240 operation. The thing I really like about this compressor, aside from the sturdy construction, is that it pumps up to 155 psi- most units you find only go to 125 psi or so. It works very well, but I had to upgrade the regulator.

A pic of my dimpling table. The plans for the table come with the press. We had some leftover carpet, and now I can lay skins down flat for dimpling. Not a scratch!

Tools- part 1

Working with sheet metal requires quite a few purpose-specific tools. After a lot of searching, and much comparison shopping, I decided to purchase the bulk of my tools from Isham at http://www.planetools.com/. Outstanding quality, and they have done all the leg work for me by gathering everything I need into one place. Very good experience with these folks. Here's the box- whew! High dollar/pound density :)


The tools all spread out.


I also added a DRDT-2 Dimple Press made by Experimental Aero. Pricey, but well worth it in my opinion.


Workshop


With the decision to build behind me, and having chosen a kit made of sheet metal, it was time to get the garage workshop up to speed. After trolling many other builders' websites and forums, and doing much comparison shopping at various tool vendors, I got to work. Here is a pic of my shop as it was a couple of months ago. You can see the work tables that I built (plans courtesy of EAA Chapter 1000- thanks, guys!), as well as the general layout of the shop. Some people have the luxury of more space, and some have managed to build similar kits in square footage that would make my last apartment look spacious. Most builders manage to git'r'done in a space the size of my 2-car garage. I have the luxury of electric heat, and the insulation helps a bit. Gotta put up some drywall! Here's another pic- looks about ready!


The journey begins!

Long story short, I earned my Private Pilot license in 2002. This involved a little time and a little more money... renting airplanes ain't cheap! Not to mention that the typical single-engine trainer, while reliable, is usually referred to as a 'Spam-can' by those who fly them- none too clean, and capable of a top speed of around 100 mph if you're lucky. Aerobatics? Forget about it. So after much waiting, and with the support of my lovely wife, I'm embarking on a real adventure- I'm gonna roll my own. :) This log will serve as a supplement for the FAA inspection as well.


After many months of research, I decided that sheet metal (aluminum) construction was the way to go, and that the RV-7 kit sold by Van's Aircraft was the best kit choice out there for the way I want to fly- slow and fast! The RV-7 can easily achieve speeds over 200 mph, is a well-proven and safe design, and is capable of all the basic aerobatic maneuvers as well. With a stall speed of around 50 mph, it'll slow down for eeeasy landings. Fast, maneuverable, safe and fun!


The picture above is a before-and-after of sorts. My job is to turn all the parts you see into a flight-worthy airframe! Better get some tools...