Sunday, April 18, 2010

Vertical Stabilizer complete!

OK, all prep work is done, on to the assembly phase  ;)


Here I am using my pneumatic squeezer to bind the rear spar to the rear spar stiffener. We'll also attach the hinge brackets at this time.


The completed rear spar.


 Here is the internal skeleton clecoed together, ready to rivet. These rivets will be squozen as well. Yes, squozen is a word.  :)


All the internal rivets are shot & bucked with the rivet gun and bucking bar. I'm really glad I opted for the tungsten steel bar when purchasing my tools. This little chunk of metal is really massive, I believe almost as dense as depleted uranium? Regardless, it makes bucking rivets an easy task.
 

The tools in question. Gun has a swivel mushroom set attached.


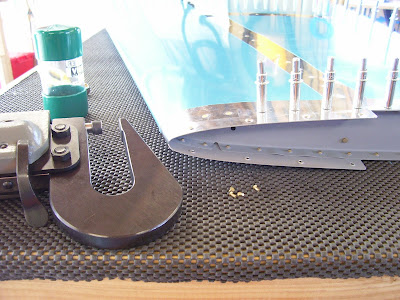
When it came time to rivet the edges of the skin, I broke out the 4" no-hole yoke for my squeezer. This made it easy to get the leading-edge rivets done.


These holes are left open. This is where the fiberglass fairing will attach, later in the process. The first and third holes from the left still have to be finished in this photo.


And, drum roll please...


                             ..."Experimental  table N904P, cleared for takeoff 23R, maintain runway heading till 1000'..."


Pretty sweet, huh? Lots of work left to do on this sub-kit, but I'm already thinking about ordering the wings.


Here's how I'm storing the completed assemblies. I found some straps at my local Ace Hardware, padded the tops with foam, and voila! Time to get to work on the control surfaces. Seeya soon!

Vertical Stabilizer, part II

Well that was fast! Between last weekend and this one, I got a lot done in the shop. With a lower parts count, the Vertical Stabilizer was a lot simpler than the HS. The same tasks were involved as before, but you're already relying more on the plans than the written instructions. I understand from reading other builders' logs that this trend continues as you get further into the kit. At this point in the project, I can say that I'm no longer afraid of shooting rivets with the gun and bucking bar. I actually enjoy it! There are definitely times where it is the best method available to you, and it gives this project the feel of artisan-level work- enjoyable and  very personal.

Anywho, here I am using my microstop cage to sink certain holes on the rear spar stiffener. These countersunk holes will then match up to holes in the rear spar which have been dimpled. Then this "sandwich" will be riveted together giving the spar greater strength. 


Dimpling holes on the rear spar...

...and on the skin. The DRDT-2 makes perfect, crisp dimples every time.

Here's a tight spot. I couldn't fit my standard dimple dies into the small space between the webs of this rib. Never fear, though- they make a tool for that!


Said tool involves 2 small dimple dies, a standard nail, and a pop-rivet puller. You can see from the pic that the nail acts as a mandrel for the dimple dies, and allows you to squeeze them sufficiently to get a nice, crisp dimple.


Here we are putting the paint booth to use...


...and enjoying the finished, primed product.


Sunday, April 11, 2010

HS finished, starting on the Vertical stabilizer.

What a great feeling! The first major sub-assembly for this project is done. Took about 2 months, and I'm very happy with how things are progressing.

With the HS, I've gotten very comfortable with my rivet gun / bucking bar combo, as well as my pneumatic squeezer. I've learned that drilling out a bad rivet should be a non-event, and that not everything has to be absolutely perfect. Zen and the art of metalworking! On to the Vertical stab.


At this point, I've broken down the edges of all ribs & spars, and fluted the ribs. The rudder hinges have all been drilled, and the stiffener has been match-drilled to the rear spar. Time to cleco the skin and match-drill the entire assembly.


Ready to cleco--


--and ready to drill. As of this writing, all match-drilling has been done, and the VS is now disassembled. There are still a few tasks to perform; dimpling, countersinking, deburring, priming. Hopefully there will be updates this week, work schedule permitting  :)


Thanks for watching, seeya soon!

Sunday, April 4, 2010

Horizontal Stabilizer, part II

Construction continues  :)

Here's a pic of the front spar with ribs clecoed to it. These will be riveted to the spar, along with several other internal pieces.


This is a shot of the rear spar, all riveted up and ready to go. The grey color is from the self-etching primer that I'm using (NAPA 7220 rattle cans).


The rivets all came out very nice with my pneumatic squeezer.


And the flush rivets on the skins are looking good aswell- I'm very happy so far. The scuffing on the aluminum is where I had to buff out a scratch. You'll never know when it's painted  ;)

The bolts for the elevator hinge bearing are supposed to be tightened to 25 in-lbs, so I got to use my nifty torque wrench. Craftsman brand, seems to be of quality.


I had to temporarily assemble everything,just because it looks so cool. It's big!


The next step is to rivet the internal structure to the skins, which will make the horizontal stabilizer about 1/3 of the way finished. I'll still have the control surfaces to fabricate, the electric trim to install, as well as the fiberglass work for the tips. Lots of work left, and that's just the horizontal part! I'm not complainin'.


Here's Nicole doing some heavy lifting- clecoes! After attaching +-175 of them, my wrists needed a break. Thanks, honey!


I'll keep you posted in a week or so...!